3.2 Selection
To manipulate with the created objects, you need to specify which objects to
work with. Most tools work with the selection.
The simplest way to select an object is by clicking it in a View.
First choose the Select/Transform tool  .
By Shift + click
you add an object to selection and by Ctrl + click you remove it from selection.
Clicking an object without any of Shift or Ctrl pressed clears the
selection and makes it the only selected object in the page. The keyboard shortcuts work
similarly for rectangular selection. Instead of plain clicking, press the left mouse button,
by dragging it define a rectangular region, and release. This modifies the selection
with all objects inside the region.
In addition, the “Edit/Select all” command (Ctrl + A) selects all objects
in the page and the “Edit/Clear selection” command (Shift + Ctrl + A)
clears the selection. You can also clear the selection by clicking the drawing area
far enough form any object.
.
By Shift + click
you add an object to selection and by Ctrl + click you remove it from selection.
Clicking an object without any of Shift or Ctrl pressed clears the
selection and makes it the only selected object in the page. The keyboard shortcuts work
similarly for rectangular selection. Instead of plain clicking, press the left mouse button,
by dragging it define a rectangular region, and release. This modifies the selection
with all objects inside the region.
In addition, the “Edit/Select all” command (Ctrl + A) selects all objects
in the page and the “Edit/Clear selection” command (Shift + Ctrl + A)
clears the selection. You can also clear the selection by clicking the drawing area
far enough form any object.
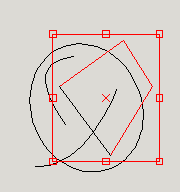
You can see a red rectangle bounding all selected objects. Also, the selected objects
are drawn in red instead of their real color. This helps you to recognize which objects
are selected and which are not.
The selection is local for pages, which means that selection changes in one page
do not affect selection in other pages at all. (This is true not only for selection,
but for all editing actions of page contents. Undo history is local for pages, too.)
Another way to select objects is to do that in the Universe browser window
(see Universe Browser).